Showing posts with label ornaments. Show all posts

Tuesday, November 19, 2013

Decorate With Salt Dough Ornaments

Add your own style with salt dough ornaments!

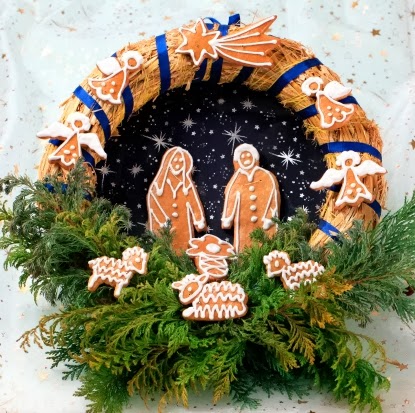
Salt dough ornaments, like the ones used to adorn this wreath, are easy to make and they will last. You can use them as Christmas tree ornaments; string them to create garlands, and much more. You’re really only limited by your imagination.

Why not get crafty, have some fun, and decorate with salt dough ornaments? It’s a project that the entire family can enjoy!

The good news is, you probably already have the things you need to make salt dough ornaments.

Supplies Needed:


[Please note: This ‘recipe’ will create enough dough to make a lot of ornaments. With that in mind, if you only plan on making a few pieces you should cut this recipe in half. Also, please remind kids that these ornaments are not intended to be eaten!]
  • ·       2 cups all-purpose flour
  • ·       1 cup salt
  • ·       1 cup water
  • ·       Cookie cutters in preferred shapes
  • ·       Toothpicks
  • ·       Acrylic paints in holiday colors
  • ·       Paintbrushes


Prepare Dough


Preheat oven to 250 degrees Fahrenheit. Prepare a floured surface for kneading the dough.

Combine the flour, salt and water – mix until a dough consistency is formed. Knead the dough on the prepared surface until the mixture becomes smooth and is elastic. If stickiness is noted you can sprinkle in a small amount of flour. Use caution not to use too much flour.

Use a rolling pin to roll the dough flat – it should be ¼” to ½” thick.

Cutting Shapes


Use the cookie cutters to cut the dough into the desired shapes. Toothpicks can be used to create designs/patterns in the shapes, as well as for making the hole that you will use to hang the ornament (if that is desired). Make the hole a little bigger than you actually want it, because the hole will get smaller as the dough bakes.

Bake the ornaments at 250 degrees for approximately 2 ½ hours. After baking the ornaments should be allowed to cool for several hours before they are handled.

Tip: Prepare the ornaments a day ahead of time – then spend the next day painting them. This is the fun part that kids can take part in too.

Paint Your Ornaments


You can get as creative and detailed as you like when painting the salt dough ornaments. It’s really up to you. Some people prefer a simple design and others want as many details as possible.

You may want to use 2 coats of paint on the ornaments – but again, it’s up to your and what you like. In fact, you could add details with a Sharpie pen.

Salt dough ornaments are a creative holiday decoration – the craft project is fun and it’s an inexpensive way to add a little holiday cheer to your home. Give it a try!


Debbie Allen is a professional content writer that often writes about ways to save money during the holidays. She especially likes to include tips that make typical holiday traditions like writing letters to Santa and decorating the tree seem more magical.

Sunday, September 13, 2009

Even Santa Himself Is Doing Christmas On A Budget This Year

With the economy in the shape that it is in most everyone is trying to do Christmas on a budget this year. Every day it seems like the unemployment rates are raising. Most people are trying to save as much as possible in these uncertain times. Here are some ideas to help you save on Christmas this year.

There are lots of simple ways to save money on Christmas, without sacrificing everyone's enjoyment. By simply going back to the basics you can save money on decorations, ornaments, and you can create homemade gifts that your kids would actually enjoy helping you make. Even Santa Himself would love these ideas.

I’m including a couple examples of simple ornaments that I have made in the past with my kids. They enjoy being creative and the time together is a true bonding experience. Crafts are fun and easy, and they can save you lots of money. Check out these ideas!

You will need:
• Gold Bells
• Small Bow
• Green Pipe Cleaner
• Paper Clip or Ornament Hanger

Instructions:
Slide six gold bells on a green pipe cleaner. Twist the pipe cleaner into a spiral tree shape that narrows at the top. Tip: a 20 ounce coke bottle works well for shaping. Twist the top end of the pipe cleaner around an opened up paper clip or an ornament hanger. Our bows have a thin wire that we use to twist around the top of the tree. Try putting glitter on it to add more effect.

Popsicle sticks can be used for all sorts of craft ideas. Here’s one idea:
Lay one Popsicle stick down flat vertically, and then lay others over it, horizontally. Glue in place, and then cut the shape to form a tree. Paint and decorate any way you want it. Don’t forget that those custom Santa Claus letters can be decorated with glitter and stars and other eye catching extras.

Another idea for cheap ornaments is purchasing the plain glass ball ornaments and having the kids decorate them. They can add the year as part of the decoration, which adds to the keepsake.

Even though we are doing Christmas on a budget this year we could never take away are children's Letters to Santa. They love to sit and write their letters to Santa every year. It is a great experience to see what your children write to Santa and it helps you understand what they are wanting for Christmas. Every year when the North Pole Letters arrive, their faces light up with excitement - this is a wonderful tradition we will be sure to continue. When we first got our Custom Santa letters it was certainly a surprise to see how authentic and real they were.

The Personalized Christmas Letters are beautifully crafted and they are a keepsake you and your children will always cherish. The letters from Santa will always be a tradition in our family, and one your family will also enjoy.


Bookmark and Share